Now that our GDW team has been making progress on tool development for our capstone project, I will explain what we've done and how it works.
The first and probably most important tool we have been working on is the comprehensive model viewer. The purpose of this tool is to give team members a preview of any game assets with textures, lighting/shading, and other post-processing effects. This ensures the assets are up to the required quality level as well as form a cohesive theme with all other assets within the game.
After starting with a base project using the Project Generator, the first step was to set up a camera system. Since this tool is a model viewer, it was sufficient to set up a TwoLoc MayaCam. The code is very simple:
mCam = mMgr->createCamera("MainCamera");
mCam->setAspectRatio(Ogre::Real(OGRE_CORE->mViewport->getActualWidth()) /
Ogre::Real(OGRE_CORE->mViewport->getActualHeight()));
mCam->setNearClipDistance(1.0f);
mCam->setFarClipDistance(10000.0f);
OGRE_CORE->mViewport->setCamera(mCam);
OGRE_CORE->mViewport->setBackgroundColour(Ogre::ColourValue(0.1f, 0.1f, 0.1f));
mCam->setPosition(0.0f, 20.0f, 0.5f);
mCam->lookAt(0, 0, 0);
OGRE_CORE->AttachMayaCam(mCam);
Going through this, the code creates a MayaCam, then sets its various viewing parameters. It then tells Ogre to use this camera and sets a default background colour to display the object on. Now that the camera exists and is activated, you then set up the "physical" properties of the camera, such as where it is and which direction it is looking. Finally, Ogre attaches the camera to the scene and it is ready to use. The maya cam uses the default control scheme as Maya so users are familiar with it.
Additionally we implemented code to switch between solid and wireframe model views.
void FBXViewer::cameraMode()
{
if(mCam->getPolygonMode()==PM_SOLID)
mCam->setPolygonMode(PM_WIREFRAME);
else
mCam->setPolygonMode(PM_SOLID);
}
Using the provided FBX Loader and myGUI, we can browse through files and load any model that we want. To properly view the model, we added in a default light which enables the viewer to clearly see whichever object is loaded.
Ogre::Light * FBXViewer::createLight()
{
//////////////////////////////////////////////////////////////////////////
//Adding in the light pointLight
Ogre::Light *pointLight = mMgr->createLight("pointLight");
pointLight->setType(Ogre::Light::LT_POINT);
pointLight->setPosition(Ogre::Vector3(0.0f,5.0f,0.0f));
pointLight->setDiffuseColour(1.0, 0.0, 0.0);
pointLight->setSpecularColour(1.0, 0.0, 0.0);
return pointLight;
}
The code is simple; it creates a light and initializes the standard light settings. Now with an fbx loader, lighting, camera, and viewing modes, we have all the basic feature we need for a model viewer. In the coming week our team will be adding more complex features such as shaders, multi-object loading, multiple viewports, and other small tweaks.
Monday, October 21

Wednesday, October 9
Wreaking Havok
There are several steps to setting up Havok from a Maya scene, but it is a great physics engine and is worth the effort. To begin with, make sure your Havok plugin is enabled in Maya, under the plugin manager. Now you should have a Havok tab which contains all its specific features. To create a simple bouncing ball scene, start with a plane and a sphere raised above it.
Next you must select each object in the scene and click the RB button in the Havok tab. This converts the object into a rigid body that Havok will later apply physics to. Once your objects are rigid bodies, you can edit their setting in Maya to change mass, centre of gravity, restitution etc. It is important to add mass to any object you wish gravity to affect, otherwise it will just float there motionless.
Next you must perform a Havok export on the scene. This window contains all the options for configuring your Havok physics file. There are many options you can play with, but there are some mandatory features you must add to the configuration (which must be in the correct order). At the very least, you must transform the scene (which converts it to the correct coordinate frames) and write to file (saves the proper format you specify). Obviously for our scene, we will also need to create rigid bodies and create a world for them to be in. These 2 allow objects to simulate having physical properties. It is necessary for gravity and collisions to work properly.
Also note that you can choose the XML format so that it can be read by you. Once you have run the particular configuration you have set up, your scene is ready for export. It is recommended to export each object individually, to keep your files organized. For this example, we will use the export all feature of Maya, and export the scene as a .FBX. This is the file type that Havok prefers, and will support the most features.
Before we get into TwoLoc, keep in mind there are some constraints for Havok scenes. You can create materials and lighting for your objects, but you cannot do everything. First, some types of lighting (ambient) and transformations are restricted, and more importantly you cannot use any material other than lambert on your objects. Also, only single colours are allowed if you don't put a texture on your models. To preview your scene, you may add the preview tool to the Havok configuration.
With both the .HBK and .FBX files saved, you now go into TwoLoc and find the FBX Loader code. Within the code there is a section to specify the file paths for your respective files (also check your textures). Make sure these are correct, and then simply run the program. If all steps were done correctly, the scene you created in Maya should now be running from TwoLoc. To double check that Havok is working, you can open up the Havok Visual Debugger and it should display the exact same thing. In the VD you can even manipulate objects and they will be updated in real-time in your game engine.
Finally, whenever you update your model or texture/lighting in Maya, you must go into the Havok files and delete the respective cache files. TwoLoc will not update anything until these have been deleted. If your model doesn't look right in your engine, make sure the cache has been deleted!
Using these simple concepts, you can create increasingly complex Havok scenes to use physics with. Its all about experimentation, and playing around with the many different settings that Havok provides.
Next you must select each object in the scene and click the RB button in the Havok tab. This converts the object into a rigid body that Havok will later apply physics to. Once your objects are rigid bodies, you can edit their setting in Maya to change mass, centre of gravity, restitution etc. It is important to add mass to any object you wish gravity to affect, otherwise it will just float there motionless.
 |
| An example scene in Maya. Note the mass of 1 for the sphere. |
 |
| You can also add 'Bake Scale' to ensure the engine does not have to perform scale calculations. |
Before we get into TwoLoc, keep in mind there are some constraints for Havok scenes. You can create materials and lighting for your objects, but you cannot do everything. First, some types of lighting (ambient) and transformations are restricted, and more importantly you cannot use any material other than lambert on your objects. Also, only single colours are allowed if you don't put a texture on your models. To preview your scene, you may add the preview tool to the Havok configuration.
 |
| The ball has just bounced off the plane. Everything seems to be working so far. |
 |
| It works! |
Using these simple concepts, you can create increasingly complex Havok scenes to use physics with. Its all about experimentation, and playing around with the many different settings that Havok provides.
Thursday, September 26
Tools of the Trade
Since we've been discussing the many uses and functionalities of game engines, this blog I will go over the tools my GDW group plans to create in TwoLoc, in conjunction with the GDW and Capstone. Our group (Gallium Gaming) has been working on a multiplayer game over the summer using HeroEngine; for GDW we have been approved to create tools for our game engine instead of a whole new game. This also ties into our Capstone Project, as creating and marketing the game will make up our project parameters.
The tools we make will be created using OOP and Game Engine concepts. We have planned to make tools which will provide extra functionality our project needs to help streamline the production process. With that in mind, our first tool will be a batch image converter. HeroEngine prefers textures be in .DDS (Direct draw surface) format because it uses DirectX for rendering, and .DDS files can be used in several different ways. .DDS files are also readily useable in OpenGL via the ARB texture compression in GLSL.
We chose this as our first tool because we will need to convert all our texture files to .DDS prior to uploading them in the HeroEngine repository. A batch converter will remove the tedious process of saving files as .DDS in photoshop (only after installing the proper plugin from nVidia). The idea is that because a game engine excels at processing and converting data, we can use this functionality to convert any number of texture file types into .DDS's. Polymorphism will be very useful because we can use a virtual function like Convert(); on each input file and they will all be converted, even if there are several different image formats.
The next tool we are planning to create is a HeroEngine model viewer. There is already an existing one, but it only features the geometry and base texture of the model. HeroEngine uses .HGM mesh files to represent objects instead of the standard .OBJ format. .HGM's are special in that they tell HeroEngine the exact shape of the mesh (whether concave or hollow) for collision purposes. We plan to create our model viewer with additional functionality such as applying shaders and post-processing effects to the models.
Once again polymorphism will help keep this tool efficient, as we can Load(); any model and then manipulate it however we want. This can include characters, objects, and any other 3D art assets. We are building this advanced model viewer so we can preview the look of our assets without going through the whole process of getting a model into the game world. This consists of uploading the model to the repository, importing it into the HeroEngine library, and finally loading it into the game world.
Finally, we are planning to create a couple smaller export tools for Autodesk Mudbox and Google Sketchup. The exporters will convert their respective file formats into .HGM files that the HeroEngine can then use. These tools will have a single purpose each, and thus are smaller and lower priority for the game. Like the first two tools, they are primarily designed to streamline the asset production process. We plan to have a large variety of weapons and objects in our game, thus need to be able to develop them rapidly. Once built, these tools will decrease production times in the long run.
The tools we make will be created using OOP and Game Engine concepts. We have planned to make tools which will provide extra functionality our project needs to help streamline the production process. With that in mind, our first tool will be a batch image converter. HeroEngine prefers textures be in .DDS (Direct draw surface) format because it uses DirectX for rendering, and .DDS files can be used in several different ways. .DDS files are also readily useable in OpenGL via the ARB texture compression in GLSL.
We chose this as our first tool because we will need to convert all our texture files to .DDS prior to uploading them in the HeroEngine repository. A batch converter will remove the tedious process of saving files as .DDS in photoshop (only after installing the proper plugin from nVidia). The idea is that because a game engine excels at processing and converting data, we can use this functionality to convert any number of texture file types into .DDS's. Polymorphism will be very useful because we can use a virtual function like Convert(); on each input file and they will all be converted, even if there are several different image formats.
The next tool we are planning to create is a HeroEngine model viewer. There is already an existing one, but it only features the geometry and base texture of the model. HeroEngine uses .HGM mesh files to represent objects instead of the standard .OBJ format. .HGM's are special in that they tell HeroEngine the exact shape of the mesh (whether concave or hollow) for collision purposes. We plan to create our model viewer with additional functionality such as applying shaders and post-processing effects to the models.
Once again polymorphism will help keep this tool efficient, as we can Load(); any model and then manipulate it however we want. This can include characters, objects, and any other 3D art assets. We are building this advanced model viewer so we can preview the look of our assets without going through the whole process of getting a model into the game world. This consists of uploading the model to the repository, importing it into the HeroEngine library, and finally loading it into the game world.
Finally, we are planning to create a couple smaller export tools for Autodesk Mudbox and Google Sketchup. The exporters will convert their respective file formats into .HGM files that the HeroEngine can then use. These tools will have a single purpose each, and thus are smaller and lower priority for the game. Like the first two tools, they are primarily designed to streamline the asset production process. We plan to have a large variety of weapons and objects in our game, thus need to be able to develop them rapidly. Once built, these tools will decrease production times in the long run.
Wednesday, September 18
Learning from Errors (Argh!!)
The past two weeks we have focused on setting up all the necessary components of the TwoLoc game engine. In hindsight it was fairly simple but it at the time it felt like there were a million steps and errors along the way. In the end I actually had to delete everything related to TwoLoc and restart the process, my laptop nearly breaking in the process. This will be a short story of the setup process and what I learned along the way.
To begin, we got two links for BitBucket, a file-sharing program with an online server. In conjunction with TortoiseHG, we used the two links provided in the tutorial to clone repositories onto our local machine. There were two main files: The dependencies and the engine itself. The dependencies are all the files which the engine requires to run, while the engine executes the programs itself. After a lengthy process (everyone was cloning at the same time), we now had a client-side version of the engine and dependencies.
The next step was to install the PATH directories for the dependencies. We opened up a .bat file which performed this task. To make sure everything worked properly, we installed the Rapid Environment Editor, a program to easily manage file paths. The key is to ensure the environment path matches your local files. Everything is going well so far, but it soon went downhill.
With the paths setup properly, we went into the dependency solution and performed a build (making sure it is set to Debug, not Debug_dll). At this point the errors began. The errors indicated that the program could not find a file called dhinput.cpp. Saad and I looked through and found the file, so it was definitely there. After a bit of investigating, we discovered one of the file paths in the include directory was missing a backslash. We made sure to fix this in the REE as well.
With that done, a new build of the dependency solution proved more successful. The rest is simply repeating the process for the TwoLocEngine. After clicking the install.bat file, the path setup only took 2 seconds which seemed suspicious. Upon trying to build the engine, there were missing file and linker errors all over the place. Checking back to the REE, I found the path did not get set up properly for the engine. Fixing that, I tried again and got a corrupt library error. At this point I asked Saad for help and we fixed it, but the error was reoccurring.
Getting very frustrated, I deleted everything to do with TwoLoc and started from scratch. A couple blue screens and a Windows Recovery later, I re-cloned the repositories and rebuilt all the solutions. This time I checked every path before-hand, ensuring nothing went wrong along the way. Sure enough the 2nd attempt was much smoother and I could actually try out some of the engine samples.
Once in the engine, you must first select a project and set it as the Startup Project. This means it will open all pertinent files for only that project when you try to debug. One final step is to copy the linker directories into the debug working directory. This makes sure all the files end up in the proper location once you run the project.
Yay! The projects ran and I played around with the samples. Unfortunately the physics cannon was broken, and Saad walked us through using the call stack and break points to debug the issue. The culprit was an overflowed buffer, and a quick increase in buffer size was sufficient to fix the error. It was a rocky start, but I can finally get to blowing things up with a physics cannon.
To begin, we got two links for BitBucket, a file-sharing program with an online server. In conjunction with TortoiseHG, we used the two links provided in the tutorial to clone repositories onto our local machine. There were two main files: The dependencies and the engine itself. The dependencies are all the files which the engine requires to run, while the engine executes the programs itself. After a lengthy process (everyone was cloning at the same time), we now had a client-side version of the engine and dependencies.
The next step was to install the PATH directories for the dependencies. We opened up a .bat file which performed this task. To make sure everything worked properly, we installed the Rapid Environment Editor, a program to easily manage file paths. The key is to ensure the environment path matches your local files. Everything is going well so far, but it soon went downhill.
 | |
| The paths look good! |
With that done, a new build of the dependency solution proved more successful. The rest is simply repeating the process for the TwoLocEngine. After clicking the install.bat file, the path setup only took 2 seconds which seemed suspicious. Upon trying to build the engine, there were missing file and linker errors all over the place. Checking back to the REE, I found the path did not get set up properly for the engine. Fixing that, I tried again and got a corrupt library error. At this point I asked Saad for help and we fixed it, but the error was reoccurring.
Getting very frustrated, I deleted everything to do with TwoLoc and started from scratch. A couple blue screens and a Windows Recovery later, I re-cloned the repositories and rebuilt all the solutions. This time I checked every path before-hand, ensuring nothing went wrong along the way. Sure enough the 2nd attempt was much smoother and I could actually try out some of the engine samples.
Once in the engine, you must first select a project and set it as the Startup Project. This means it will open all pertinent files for only that project when you try to debug. One final step is to copy the linker directories into the debug working directory. This makes sure all the files end up in the proper location once you run the project.
Yay! The projects ran and I played around with the samples. Unfortunately the physics cannon was broken, and Saad walked us through using the call stack and break points to debug the issue. The culprit was an overflowed buffer, and a quick increase in buffer size was sufficient to fix the error. It was a rocky start, but I can finally get to blowing things up with a physics cannon.
Monday, September 9
Hero Engine: An Overview
To start this round of blogging, I will begin with a quick look into an engine several classmates and I have been working with over the summer break. A group of us have been working on a multiplayer game called They Stole My Sheep. It has been designed to not take itself too seriously while tuning the game play to promote a competitive atmosphere. We chose to use Hero Engine because of its relatively easy to use interface and multiplayer capabilities.
Hero Engine features a full graphical UI as well as a script editor, similar to how Unity is displayed. The Engine comes with several pre-loaded base scripts which the user must adapt to work with the game they are creating. The game world itself is constructed through the use of a height map editor and various terrain tools such as Speed Tree. These features combined with importing custom characters and models, you are able to build a fully functioning game with prominent multiplayer features. One such example is the MMO Star Wars: The Old Republic which was released at the end of 2011 with positive reviews.
The engine contains two main programs: Hero Blade, which runs the scripts and houses the game world, and the Repository Browser, which enables easy transferring of files from your computer or shared network storage over to the server-side storage of Hero Engine. Both of these systems form the basis of Hero Engine and creates an efficient pipeline to gets assets into the developer's game world.
Within Hero Blade, several key systems provide the functionality of the engine. These include: Terrain Editor, HeroScript Editor, physics tools, and editors for lighting, GUI, post-processing, water, and particles. In addition it provides helpful error messages in the chat panel to accelerate the bug fixing process. The Repository Browser primarily syncs files to and from the client and server.
After learning more about the nuances of Hero Engine, we have come across many of its pros and cons. While it does boast many different networking capabilities, we have found that some of its functions are tricky to use effectively, let alone find them. This steep learning curve is also hindered by the low level of documentation for Hero Engine. There is a wiki for the engine but it is not very comprehensive and the forums often don't have the concrete answers we are looking for.
With all that said, Hero Engine has provided us with handy world editing tools with which we rapidly set up a full game level. The process to set up the art pipeline takes a few minutes, but after that the artists can sync files to the server with ease. The asset pipeline has also been very beneficial for the artists, as any model can be transferred and updated in real-time while the engine is running, allowing for immediate feedback in the game world.
Though our team has been presented with many challenges, we are determined to unlock the potential of Hero Engine and fully utilize all its built-in features. I will continue to add updates of our progress as we continually build on the game world we created. Hopefully we will soon have a game play video to showcase and let everyone see what you can accomplish with Hero Engine.
Hero Engine features a full graphical UI as well as a script editor, similar to how Unity is displayed. The Engine comes with several pre-loaded base scripts which the user must adapt to work with the game they are creating. The game world itself is constructed through the use of a height map editor and various terrain tools such as Speed Tree. These features combined with importing custom characters and models, you are able to build a fully functioning game with prominent multiplayer features. One such example is the MMO Star Wars: The Old Republic which was released at the end of 2011 with positive reviews.
 |
| HeroBlade program showing a small portion of our game world. |
The engine contains two main programs: Hero Blade, which runs the scripts and houses the game world, and the Repository Browser, which enables easy transferring of files from your computer or shared network storage over to the server-side storage of Hero Engine. Both of these systems form the basis of Hero Engine and creates an efficient pipeline to gets assets into the developer's game world.
Within Hero Blade, several key systems provide the functionality of the engine. These include: Terrain Editor, HeroScript Editor, physics tools, and editors for lighting, GUI, post-processing, water, and particles. In addition it provides helpful error messages in the chat panel to accelerate the bug fixing process. The Repository Browser primarily syncs files to and from the client and server.
 |
| Repository Browser has synced three files to the Hero Engine server. |
After learning more about the nuances of Hero Engine, we have come across many of its pros and cons. While it does boast many different networking capabilities, we have found that some of its functions are tricky to use effectively, let alone find them. This steep learning curve is also hindered by the low level of documentation for Hero Engine. There is a wiki for the engine but it is not very comprehensive and the forums often don't have the concrete answers we are looking for.
With all that said, Hero Engine has provided us with handy world editing tools with which we rapidly set up a full game level. The process to set up the art pipeline takes a few minutes, but after that the artists can sync files to the server with ease. The asset pipeline has also been very beneficial for the artists, as any model can be transferred and updated in real-time while the engine is running, allowing for immediate feedback in the game world.
Though our team has been presented with many challenges, we are determined to unlock the potential of Hero Engine and fully utilize all its built-in features. I will continue to add updates of our progress as we continually build on the game world we created. Hopefully we will soon have a game play video to showcase and let everyone see what you can accomplish with Hero Engine.
Wednesday, October 31
Tunnel of Love
Team: Awesome Possum
Game: Tunnel of Love
Members:
Taylor Holoiday #100422647
Alex Bedard-Reid #100423694
Connor McCarthy #100426175
Aaron Providence #100429531
Mackenize Sturrup #100429591
The goal of the wedding proposal game is to convey the pacing and feel of the Isaac's Wedding Proposal viral video. After brainstorming a few concepts we decided to give the player a semi-linear degree of freedom. The level takes place in a straight hallway with several doors to each side. The player is free to explore this hallway at their leisure, but the rooms unlock in a certain order, guiding the player to explore each one before progressing to the next. The player in our game is 'the guide', and symbolizes the car moving in the video.
At the end of the hallway the final door leads to the final room. This is where the wedding proposal takes places and all of the bride's friends are there waiting for her. The individual rooms each contain a different memory of their relationship as highlighted in the video. At the final door we feature our scripted npc movement and the culminating proposal. The four critical events are: first meeting, first date, proclaiming love, and moving in together.
The game takes place in first-person perspective, with WASD for movement and space bar for jumping. Moving the mouse will rotate the camera and clicking will interact with certain objects such as doors and the heart pieces. The controls are simple to keep the player focused on exploring the scenery around them.
The game play in the Tunnel of Love is to simply collect the four heart pieces to unlock the final door and enable the wedding proposal to take place. The pieces are generally easy to find but motivate the player to explore each room and observe the beauty within. Upon reaching the final proposal, the player must collect the completed heart to activate the 'Will you marry me?' line, thus completing the wedding proposal.
Our level design goals for the Tunnel of Love were to capture the emotion of each relationship event and emphasize the atmosphere of each. They serve as a timeline of Amy and Isaac's time together and lead up to the final wedding proposal. By separating these into individual rooms, each room feels very distinct and memorable. The hallway itself represents the linear path Amy takes in her journey to Isaac. It guides her along taking her to the various memories along the way. We planned to have Amy follow the player throughout the level but this feature did not make the final version.
The rooms do not literally convert the video's content but rather extrapolate the feeling of each to create a unique scenario displaying the interactions between Isaac and Amy. The first meeting takes place in a serene park with the pair both feeding ducks on a bench. This scene is calm and pleasant, focusing on the simplicity of the atmosphere.
The second room is a romantic restaurant scene in which the couple are enjoying a meal together. This is their first official date and it focuses on the intimate atmosphere and closeness between the couple. The third room is another romantic scene where the couple proclaims their love for each other. It takes place on a breathtaking beach and the couple are alone, with no one but each other. The final room features the couple moving in together; the next major step in their lives. It is not as exciting or romantic, but it is a very important step for the couple so we included it in the game.
Once the player has collected the heart piece from each room, they may open the final door and let the wedding proposal proceed. This is the end of the game, and coincides with the ending of the video. The Tunnel of Love has very simple game play elements and focuses more the aesthetics and atmosphere of the couple's interactions. It could be considered an art game because of these features.
Game: Tunnel of Love
Members:
Taylor Holoiday #100422647
Alex Bedard-Reid #100423694
Connor McCarthy #100426175
Aaron Providence #100429531
Mackenize Sturrup #100429591
The goal of the wedding proposal game is to convey the pacing and feel of the Isaac's Wedding Proposal viral video. After brainstorming a few concepts we decided to give the player a semi-linear degree of freedom. The level takes place in a straight hallway with several doors to each side. The player is free to explore this hallway at their leisure, but the rooms unlock in a certain order, guiding the player to explore each one before progressing to the next. The player in our game is 'the guide', and symbolizes the car moving in the video.
At the end of the hallway the final door leads to the final room. This is where the wedding proposal takes places and all of the bride's friends are there waiting for her. The individual rooms each contain a different memory of their relationship as highlighted in the video. At the final door we feature our scripted npc movement and the culminating proposal. The four critical events are: first meeting, first date, proclaiming love, and moving in together.
The game takes place in first-person perspective, with WASD for movement and space bar for jumping. Moving the mouse will rotate the camera and clicking will interact with certain objects such as doors and the heart pieces. The controls are simple to keep the player focused on exploring the scenery around them.
The game play in the Tunnel of Love is to simply collect the four heart pieces to unlock the final door and enable the wedding proposal to take place. The pieces are generally easy to find but motivate the player to explore each room and observe the beauty within. Upon reaching the final proposal, the player must collect the completed heart to activate the 'Will you marry me?' line, thus completing the wedding proposal.
Our level design goals for the Tunnel of Love were to capture the emotion of each relationship event and emphasize the atmosphere of each. They serve as a timeline of Amy and Isaac's time together and lead up to the final wedding proposal. By separating these into individual rooms, each room feels very distinct and memorable. The hallway itself represents the linear path Amy takes in her journey to Isaac. It guides her along taking her to the various memories along the way. We planned to have Amy follow the player throughout the level but this feature did not make the final version.
The rooms do not literally convert the video's content but rather extrapolate the feeling of each to create a unique scenario displaying the interactions between Isaac and Amy. The first meeting takes place in a serene park with the pair both feeding ducks on a bench. This scene is calm and pleasant, focusing on the simplicity of the atmosphere.
The second room is a romantic restaurant scene in which the couple are enjoying a meal together. This is their first official date and it focuses on the intimate atmosphere and closeness between the couple. The third room is another romantic scene where the couple proclaims their love for each other. It takes place on a breathtaking beach and the couple are alone, with no one but each other. The final room features the couple moving in together; the next major step in their lives. It is not as exciting or romantic, but it is a very important step for the couple so we included it in the game.
Once the player has collected the heart piece from each room, they may open the final door and let the wedding proposal proceed. This is the end of the game, and coincides with the ending of the video. The Tunnel of Love has very simple game play elements and focuses more the aesthetics and atmosphere of the couple's interactions. It could be considered an art game because of these features.
Tuesday, October 9
Interpolation Techniques
This blog will spotlight the various linear, spline and slerp interpolations found in World of Warcraft. Being such a large game there are multitudes of interpolation uses found in the game. I will go over several of the more prominent and noticeable applications.
First, being an MMO there are thousands of enemies scattered throughout Azeroth and beyond. While questing out in the world your character is often beset upon by these monsters when you enter within a certain range of them. Once in combat, the enemy will proceed to move toward your character using linear interpolation pathfinding. They will find the most direct route and head toward you.
Lerp is also used for the thousands of character and object animations in WoW. A very good example of the lerp (with skeletal-based skinning) is the dancing animations for the various races of Azeroth. The model smoothly move from pose to pose in a rather intricate show of model morphing.
Another key feature (and important mechanic-wise) is the camera in WoW. It defaults as 3rd person but can be zoomed in fully to present you with a 1st person view. In almost every situation you're going to want it fully zoomed out though. It follows the same principle as a car: you want to be aware of your surroundings at all times. The camera is instrumental because it allows you to view the necessary areas around your character to keep you informed of what is happening.
This is just a few examples, but in a game of WoW's scale there are many different uses for interpolation and the World of Warcraft would not be the same without it.
First, being an MMO there are thousands of enemies scattered throughout Azeroth and beyond. While questing out in the world your character is often beset upon by these monsters when you enter within a certain range of them. Once in combat, the enemy will proceed to move toward your character using linear interpolation pathfinding. They will find the most direct route and head toward you.
Lerp is also used for the thousands of character and object animations in WoW. A very good example of the lerp (with skeletal-based skinning) is the dancing animations for the various races of Azeroth. The model smoothly move from pose to pose in a rather intricate show of model morphing.
Another key feature (and important mechanic-wise) is the camera in WoW. It defaults as 3rd person but can be zoomed in fully to present you with a 1st person view. In almost every situation you're going to want it fully zoomed out though. It follows the same principle as a car: you want to be aware of your surroundings at all times. The camera is instrumental because it allows you to view the necessary areas around your character to keep you informed of what is happening.
 |
| (servers are down so screenshots are not my own) |
The camera in WoW must use Quaternion Slerp for this as it is an essential tool for the player. In real time you can zoom in and out, and rotate the camera around your character to view anything you want. The rotations are smooth and there are no problems with Gimbal Lock (does not use Euler Angles!!) With an intuitive and flexible camera system, the world of Azeroth would be a much more difficult place to explore.
Spline interpolations are also found in many different parts of WoW. Because all projectiles in WoW will auto-hit their target regardless of its location, projectiles will often curve midair to reach their goal. Spline interpolation dictates that the projectile will follow a smooth curve from its target to its destination (ouch!). If the enemy moves, the spline is automatically re-calculated to compensate for all changing factors. Watch for the blue projectiles in the following video.
This is just a few examples, but in a game of WoW's scale there are many different uses for interpolation and the World of Warcraft would not be the same without it.
Wednesday, September 26
Defying Gravity
Since my group will have a paltry 4 minutes to present (1min 20 sec each), here is a more detailed description/walk-through of my puzzle level. Once again, I'll add a video walk-through next time I get the chance.
My level is called Defy Gravity and it is named as such due a very unique feature it contains. Lets begin from the start. On the left side of the chamber is the OR gate in my level. It works through a set of two timed pedestal buttons. Each is connected to a laser emitter, both of which will hit the central laser relay when activated. These are the two inputs in the OR gate; the output is the flip panel which is connected to the laser relay.
When either of the buttons are pushed, their respective laser is turned on which in turns activates the flip panel (for the duration of the pedestal timer). This is the primary means to travel between the main two sections in the chamber.
Once across the OR gate, you are confronted with a companion cube and and a reflection cube. This is the tricky part. The companion cube is needed for the rest of the level, but obviously can only be used for one purpose at a time. A set of indicator lights on the ground tries to hint player to set the reflection cube on the nearby piston platform. This is because the platform will be raised to the height of a laser emitter.
We have reached the point of no return. Prepare to defy gravity. The button featured above controls two different mechanisms: the piston platform, and the shown laser emitter. In its off state the piston is off and the laser is on. Inversely, when on the piston is on and the laser is off; this makes is a dual normal/NOT gate. It is hard to explain how this mechanic works so please refer to the youtube video.
As you can see, when the player steps off the button, the piston lowers and the laser turns back on. The trick is that the reflection cube will stay floating when the piston is lowered down again. I'm not sure whether this is an intentional feature or a glitch, but it can lead to some really interesting design possibilities and my level certainly takes advantage of it.
The laser emitter turns on a tractor beam which leads to the level exit. But to get there you must first head back to the first section of the level (via the OR gate). Using the OR gate is the only way to get back and still have the companion cube with you. You must then use the cube to raise a set of nearby stairs. This gives access to the pedestal button, which activates a flip panel. If you can't reach it, jump!
With the button pressed you can portal up to the flip panel and jump to the nearby faith plate. This leads to the tractor beam on the opposite side of the chamber; you are almost there!
If you remembered to take your companion cube with you, you can now place it on the final NOT gate button to deactivate the laser field. However if forgot it, there is a conveniently placed faith plate to send you back over the tall laser field into the main section. Now head through the exit and rejoice: you have solved this nefarious puzzle!
Hope you enjoyed Defy Gravity and I have a feeling I might continue making more awesome portal puzzles, I'm rather addicted :D
 |
| It can't be that bad...right? |
My level is called Defy Gravity and it is named as such due a very unique feature it contains. Lets begin from the start. On the left side of the chamber is the OR gate in my level. It works through a set of two timed pedestal buttons. Each is connected to a laser emitter, both of which will hit the central laser relay when activated. These are the two inputs in the OR gate; the output is the flip panel which is connected to the laser relay.
When either of the buttons are pushed, their respective laser is turned on which in turns activates the flip panel (for the duration of the pedestal timer). This is the primary means to travel between the main two sections in the chamber.
 |
| From the entrance. The first thing you notice is the pedestal button to your left. |
 |
| This is the activated pedestal button on the left side of the OR gate. |
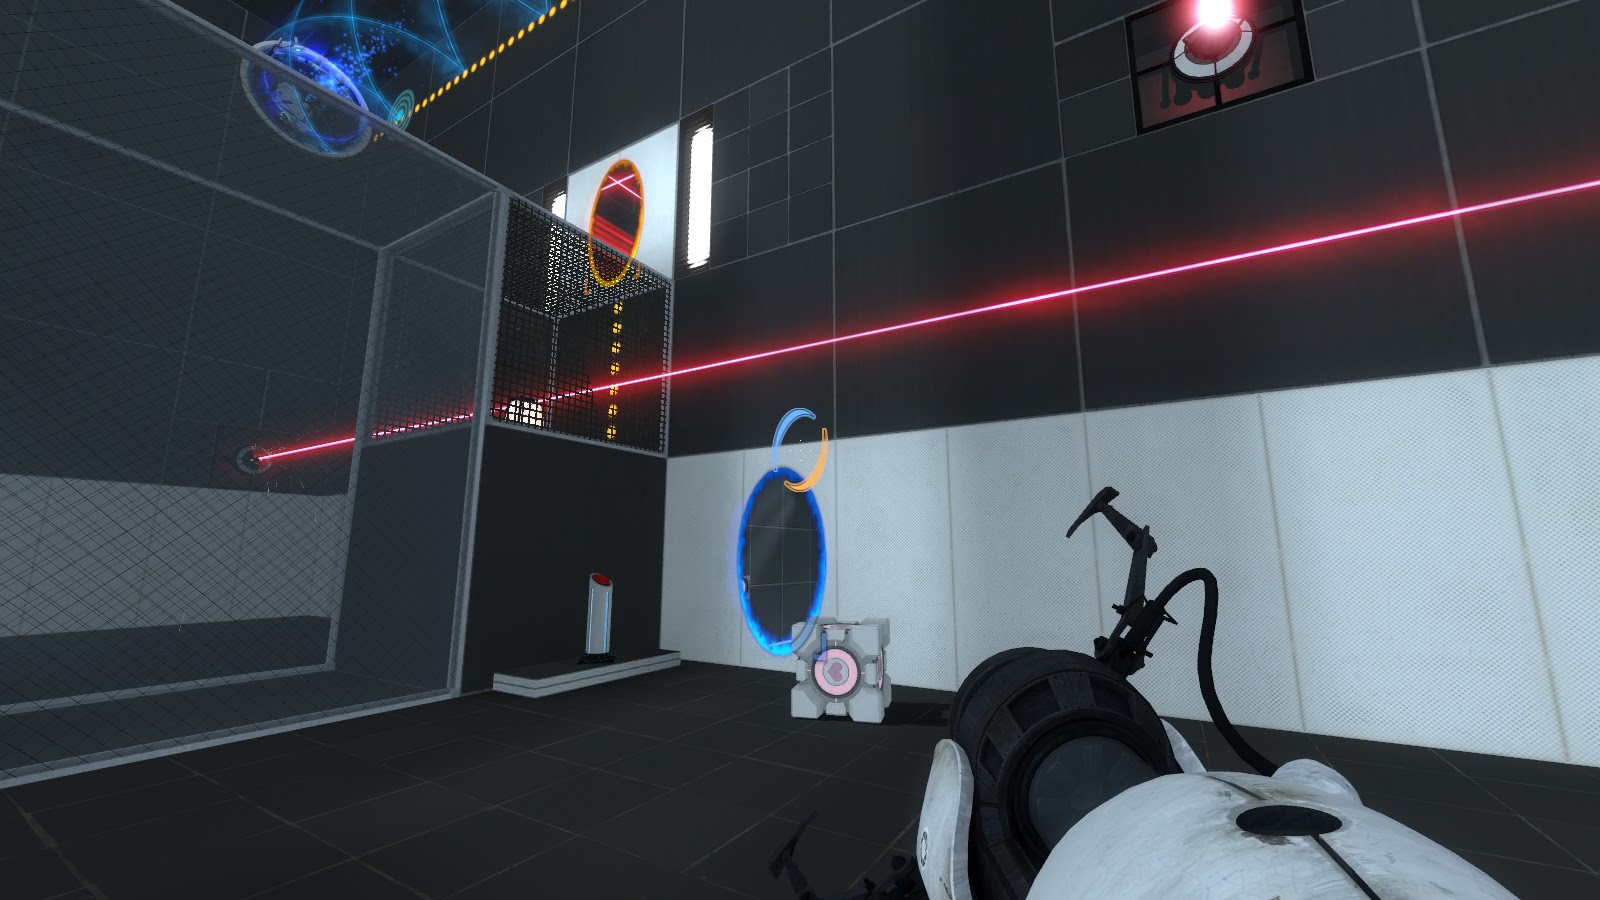 |
| The other side of the OR gate. |
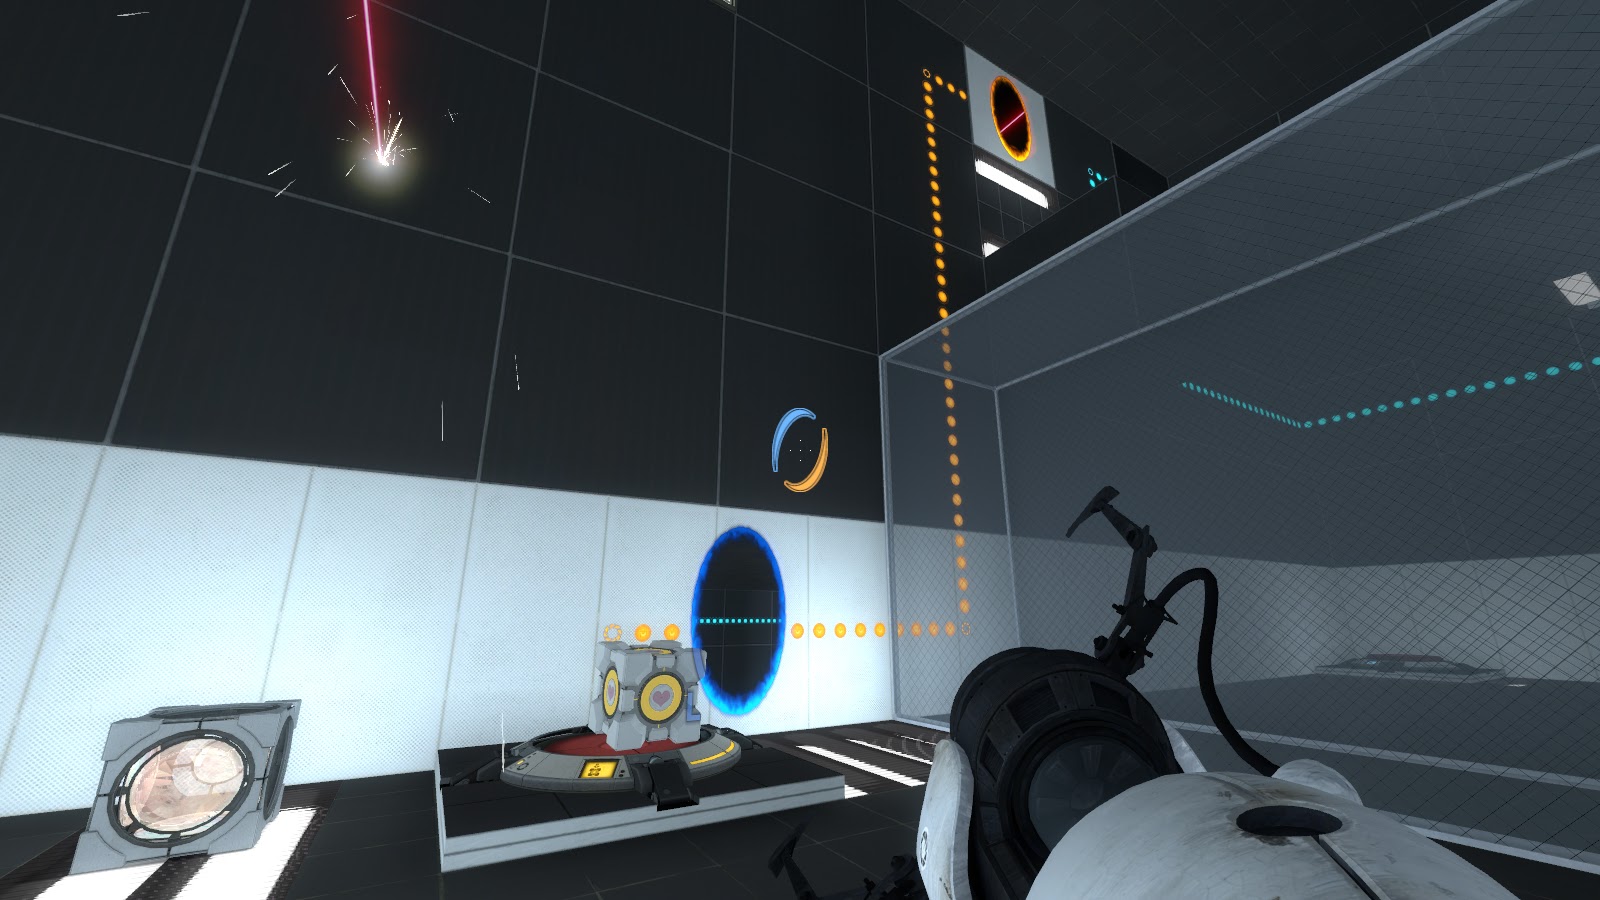 |
| The two cubes. (Companion cube has been moved onto the nearby button.) |
 |
| Make sure to place the cube on the center of the piston facing the laser receiver! |
 |
| Now you can access the faith plate which leads to the button. |
We have reached the point of no return. Prepare to defy gravity. The button featured above controls two different mechanisms: the piston platform, and the shown laser emitter. In its off state the piston is off and the laser is on. Inversely, when on the piston is on and the laser is off; this makes is a dual normal/NOT gate. It is hard to explain how this mechanic works so please refer to the youtube video.
As you can see, when the player steps off the button, the piston lowers and the laser turns back on. The trick is that the reflection cube will stay floating when the piston is lowered down again. I'm not sure whether this is an intentional feature or a glitch, but it can lead to some really interesting design possibilities and my level certainly takes advantage of it.
The laser emitter turns on a tractor beam which leads to the level exit. But to get there you must first head back to the first section of the level (via the OR gate). Using the OR gate is the only way to get back and still have the companion cube with you. You must then use the cube to raise a set of nearby stairs. This gives access to the pedestal button, which activates a flip panel. If you can't reach it, jump!
With the button pressed you can portal up to the flip panel and jump to the nearby faith plate. This leads to the tractor beam on the opposite side of the chamber; you are almost there!
 |
| The stairs only remain active while the button is pushed. |
 |
| Here we gooooo! (Don't forget your cube <3) |
 |
| Wubwubwub. |
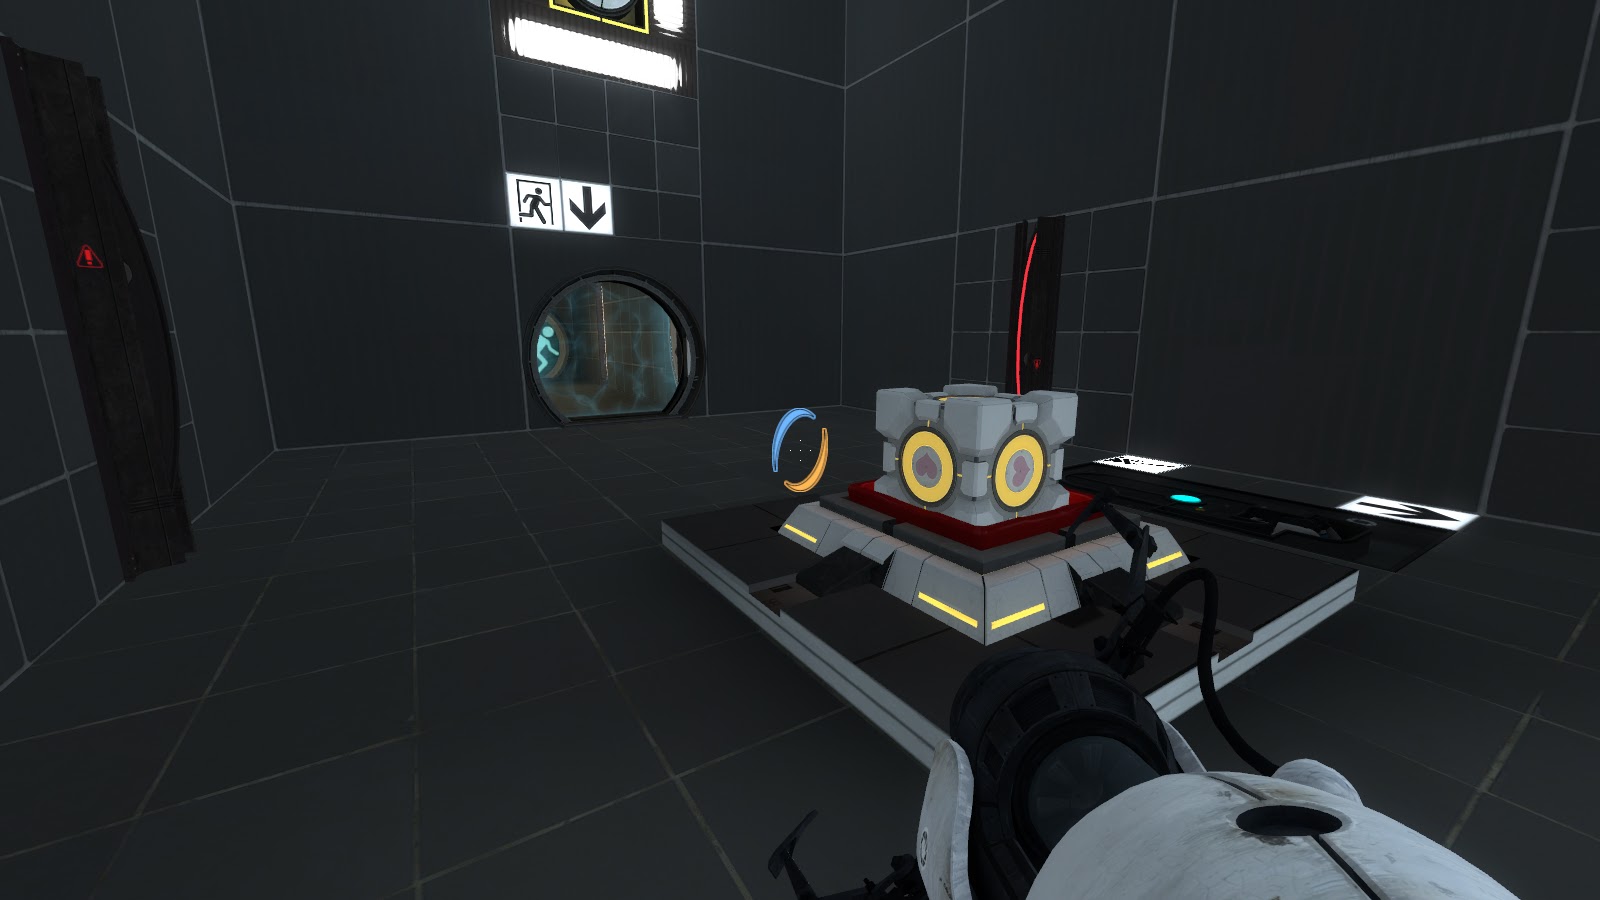 |
| Nicely done :) |
Friday, September 21
Animation Revisited
Well its early morning and I don't exactly have the energy to think of an interesting blog post, so I'll just recant you with a woeful tale of triumph and loss. Thus begins the Animation Chronicles (part 1 of 1).
Last year this Animation class scared me a lot, and not because of the math or 3D modelling. When Professor Hogue gave us the list of homework questions my brain shut down for a minute or two. But all was not lost. I slowly worked through the first couple easy questions on interpolation and managed to get it working. I started all my homework questions from scratch so I really got to know the proper steps in beginning an OpenGL project.
As I went through some of the easy questions I gained more confidence and was always very proud when I managed to accomplish things I never thought I would figure out. Time goes on and I get some more questions done. Then inevitably I run out of time at the end because lets be serious; I'm not that great at programming. I have to put a lot of time into simple programs just to get them working, and my OOP skills are awful.
Yet I somehow managed to get the 40exp by the end and write the exam. Now I wish I knew what mark I received on it, because I felt pretty good with the exam. Not great, but good. And then a meteorite (metaphorical, don't worry) hits and my GDW gets hammered for our graphics not working in our game. I kind of wish it was marked based on more than the visual because all the code was there for our animation etc.
Nonetheless between a mediocre exam mark (I guess?) and virtually getting 0 on the GDW 25%, here I am in Animation again. It is a prerequisite for Game Engines in Year 3 which is a prerequisite for nearly every course in the rest of this program.
Complaining aside, I'm going to totally kick butt this time around. I have nothing left to lose really. My GDW group is split up, I had to take a bunch of electives because there were no other Game Dev courses without Animation as a prerequisite, and I suppose I need the credits.
So here's to another semester with Animation: Algorithms and Techniques, this time with blogs. Cheers.
Last year this Animation class scared me a lot, and not because of the math or 3D modelling. When Professor Hogue gave us the list of homework questions my brain shut down for a minute or two. But all was not lost. I slowly worked through the first couple easy questions on interpolation and managed to get it working. I started all my homework questions from scratch so I really got to know the proper steps in beginning an OpenGL project.
As I went through some of the easy questions I gained more confidence and was always very proud when I managed to accomplish things I never thought I would figure out. Time goes on and I get some more questions done. Then inevitably I run out of time at the end because lets be serious; I'm not that great at programming. I have to put a lot of time into simple programs just to get them working, and my OOP skills are awful.
Yet I somehow managed to get the 40exp by the end and write the exam. Now I wish I knew what mark I received on it, because I felt pretty good with the exam. Not great, but good. And then a meteorite (metaphorical, don't worry) hits and my GDW gets hammered for our graphics not working in our game. I kind of wish it was marked based on more than the visual because all the code was there for our animation etc.
Nonetheless between a mediocre exam mark (I guess?) and virtually getting 0 on the GDW 25%, here I am in Animation again. It is a prerequisite for Game Engines in Year 3 which is a prerequisite for nearly every course in the rest of this program.
Complaining aside, I'm going to totally kick butt this time around. I have nothing left to lose really. My GDW group is split up, I had to take a bunch of electives because there were no other Game Dev courses without Animation as a prerequisite, and I suppose I need the credits.
So here's to another semester with Animation: Algorithms and Techniques, this time with blogs. Cheers.
Thursday, September 20
Noopsie Ball
Today I was part of team B and we designed (Extreme) Human Foosball. The idea began to formulate when team members were discussing limiting movement for players in the game. This combined with the idea that you could only hit the ball and not catch it, was the basis for our game.
Team A came up with Chaos Ball, which at first seemed a little dangerous. Risk of physical injury aside, their approach used the level design well by creating chair obstacles. It seemed to be a bit more low-key than Human Foosball but was similar in simplicity and movement constraints.
The rules for Human Foosball are as follows: two teams have 2 rows of offense and a row of defense. The goal is to score/keep the other team from scoring in the plastic bin. The players are only allowed one step the side in each direction and may not turn out. The ball cannot be caught; it must be bounced off the player. If the ball hits the ground or goes out of bounds, the player which dropped it must throw it to the other team to get the action started again. The team with the highest number of goals after a specified time limit is the winner.
In the diagram below, the green team's wants the ball to go to the right and thus they can only face to the right. This means the offense wants to get the ball in the goal (grey box) while the row of defense wants to hit it away from the goal to prevent the opposing team from scoring. The principal is the same for the blue team, except they face to the left.

Human Foosball takes advantage of the players as part of its level design. Originally we considered having 6 players per row but that would lead to players further out never getting a chance to play, as move of the action is centered around the plastic bin goal. With 6 rows of 4 players, the 'level' was evenly distributed so that each player would have an opportunity to attack/defend.
The advantage of having the players define the level boundary is that Human Foosball can be played virtually anywhere there is enough room; it does not have to be in a classroom with tables and chairs.
In Chaos Ball each team had a set number of players distributed throughout the classroom. They had to remain on the tables and never touch the floor. To make a successful pass to a team-mate, the player must bounce the ball off an object at least once before it reaches its destination. Each ball pass, every player is allowed a maximum of 3 steps on top of the tables. To score, a player must throw the ball into the plastic bin goal; this is unique in that it does not require a bounce first. The players are allowed to block shots made by the opposing team.

The level design in Chaos Ball is constructed randomly:at the start of the match each player in the game gets to set a chair on a table anywhere on the playing area. This creates a maze-like level and can lead to certain strategies being formed by the teams. For example, they could coordinate where their chairs are placed to effectively block off a certain area from play.
The advantages of Chaos Ball are its strategic depth (placement of chairs) and that you may never play the same game twice. The fluidity of the level design gives players constant new opportunities to try new tactics and maneuvers. This gives it elements of both strategy and skill and can potentially be more emotionally rewarding to play than Human Foosball.
Team A came up with Chaos Ball, which at first seemed a little dangerous. Risk of physical injury aside, their approach used the level design well by creating chair obstacles. It seemed to be a bit more low-key than Human Foosball but was similar in simplicity and movement constraints.
The rules for Human Foosball are as follows: two teams have 2 rows of offense and a row of defense. The goal is to score/keep the other team from scoring in the plastic bin. The players are only allowed one step the side in each direction and may not turn out. The ball cannot be caught; it must be bounced off the player. If the ball hits the ground or goes out of bounds, the player which dropped it must throw it to the other team to get the action started again. The team with the highest number of goals after a specified time limit is the winner.
In the diagram below, the green team's wants the ball to go to the right and thus they can only face to the right. This means the offense wants to get the ball in the goal (grey box) while the row of defense wants to hit it away from the goal to prevent the opposing team from scoring. The principal is the same for the blue team, except they face to the left.

Human Foosball takes advantage of the players as part of its level design. Originally we considered having 6 players per row but that would lead to players further out never getting a chance to play, as move of the action is centered around the plastic bin goal. With 6 rows of 4 players, the 'level' was evenly distributed so that each player would have an opportunity to attack/defend.
The advantage of having the players define the level boundary is that Human Foosball can be played virtually anywhere there is enough room; it does not have to be in a classroom with tables and chairs.
In Chaos Ball each team had a set number of players distributed throughout the classroom. They had to remain on the tables and never touch the floor. To make a successful pass to a team-mate, the player must bounce the ball off an object at least once before it reaches its destination. Each ball pass, every player is allowed a maximum of 3 steps on top of the tables. To score, a player must throw the ball into the plastic bin goal; this is unique in that it does not require a bounce first. The players are allowed to block shots made by the opposing team.

The level design in Chaos Ball is constructed randomly:at the start of the match each player in the game gets to set a chair on a table anywhere on the playing area. This creates a maze-like level and can lead to certain strategies being formed by the teams. For example, they could coordinate where their chairs are placed to effectively block off a certain area from play.
The advantages of Chaos Ball are its strategic depth (placement of chairs) and that you may never play the same game twice. The fluidity of the level design gives players constant new opportunities to try new tactics and maneuvers. This gives it elements of both strategy and skill and can potentially be more emotionally rewarding to play than Human Foosball.
Subscribe to:
Posts (Atom)